
About Me

- Katie's A-level blog
- I created this blog to post my photography work for my A-level course.
Wednesday 4 May 2016
Invigilation Sticker // Signs
Invigilation Sticker // Making Tracks

Tuesday 3 May 2016
Project Evaluation // Signs
What was the project brief?
The brief of the project was to create a project using one of the ten words we were given. I chose the word 'Signs' from the list of ten words.
1.What was the project theme and what did you think of it?
The theme of my project was the word 'Signs', of which I chose from a list of ten words. Due to having chosen the theme of my project from a set list, I quite enjoyed it as I had the freedom to explore the word and go through for a specific idea of Disneyland character's body language, that related to the word I chose.
2. What part of the project did you enjoy the most / find the most interesting?
The part of the project that I enjoyed the most was taking the photographs for the project, this is due to taking the photos in Disneyland and being able to participate in the environment and have fun at the park whilst creating my project.
3. What techniques have you experienced?
The techniques that I used during this project are composition, taking more pictures than I 'need' as some will come out better than others and you never know until you look at your images on a computer.
4. What technique would you like to develop further?
The technique that I'd like to develop further is composition, as this is a vital element of any image and can instantly change how photograph looks with how well this is done. Another technique I used is asking for a picture to the staff of the parks for the characters as that put me out of my comfort zone and meant I got the images that I wanted.
5. Which photographers did you research in this project?
The photographers that I researched this project are Sanja Ivekovic, Jirka Väätäinen, Annie Leibovitz, Kevin Davis, and Drick172
6. How have they influenced your photographs?
They have influenced my photographs and project as a whole through their ideas and concepts. Also the way they have made their composition highlight their imagery from how they took the photograph and where in the frame the subject is. Also Ivekovic's imagery inspired me by her impersonating images from fashion magazines, whilst the actors dressed up as the characters are impersonating the character that they're dressed as.
7. Which technique did you enjoy the most?
The technique that I enjoyed the most is asking for the pictures, due to feeling like I was challenging myself by pushing myself out of my comfort zone. Also due to the characters being willing to participate and standing in poses that meant that I got the type of images that I wanted.
8. What do you feel is the most successful part of your project and why?
I feel that the most successful part of my project is my final outcome, due to the photographs being the kind of images that I wanted. Also because I managed to get photographs of a large variety of Disney characters portraying 'Signs' related to the character that they're portraying. The composition and colours of my images, are another thing that I feel I did well to result in the overall project.
9. Did you encounter any problems with your project?
I don't think I encountered any problems with my project.
10. What would you do differently given the chance to complete the project again?
If given the opportunity to complete the project again I'm not too sure what I'd do differently as I'm really pleased with the final result and how the project has come together. Though I may have looked into more research into 'body language' and the Disney films, to help me to come to my final images.
11. What do you think about your final outcome and what are your feelings about the project?
I'm really pleased with the final outcome of my project this is due to how all the images came out through the actors participation to create the body language and images that I did, the composition that I got when I took the images, and the colours that I got in the images due to the characters and the park overall then with editing the levels of the images later on.
Presentation of Project // Signs
I have presented my project for my exam piece of the word 'Signs' as an A5 booklet.
I have called the project 'Disney Dreams', which uses alliteration so its catchy and grabs the viewers attention.
Below is the front page for my project booklet

I have called the project 'Disney Dreams', which uses alliteration so its catchy and grabs the viewers attention.
Below is the front page for my project booklet

I am very happy with the outcome of my project, and with how I have presented the project as I feel it conveys my ideas and what I wanted to portray. This is due to showing a form of 'Signs' through Disney characters and Disneyland
Monday 2 May 2016
Disney Final Images Edited // Signs
I edited these images through the levels on Photoshop Elements 13, that I have installed on my computer at home. I like these edited images more than the original ones as the colours stand out more, with the Disney theme being an overlying stand out factor of the images.
The contact sheet of these images is below.

I am really happy with how these images have came out and have shaped my project. This is due to having an idea and it fitting into the time in which I'm out the country on a trip, meaning I can capture unique pictures for my project.
Disney Final Images Unedited // Signs
I have chosen my final images that I am going to use for my project, which I have posted a contact sheet of below. Though this contact sheet has them unedited, it shows which ones I have chose and how they looked before they were edited.

The images that I have chosen are my favourites that I took of the character's whilst I was at Disneyland Paris. Also I feel that they show what I am trying to portray within my project of signs within body language through character's at Disneyland.
Disney Images // Signs
The images below are all the images that I took at Disneyland Paris on my Nikon D90 camera whilst I was there for two days.
These show all the character's that I photographed on their own, as well as others that got taken around the parks.


I am really happy with the images that I have taken, resulting in me being able to use these for my project and not having to divert to a different idea as I got the type of images that I wanted.
Sanja Ivekovic - double life series // Signs
Sanja Ivekovic's Double Life Series shows image from women's fashion magazine framed next to an image taken on Ivekovic before these images came out.
The website www.moma.org wrote "For this series, the artist juxtaposed pictures of herself culled from her private albums with commercial ads clipped from the pages of popular magazines and newspapers. One part of each pair depicts Iveković through distinct periods of her life, enacting for the camera different poses, while the other part shows models advertising in women’s magazines such as Elle, Grazia, Brigitte, and Svijet. If you look closely, you will notice that sets are paired on the basis of similarities in appearance, gesture, props, locations, and situations. All images are dated, making clear that in most cases the artist was not simply mirroring media constructs of femininity but in fact was predating them—many of her remarkable self-portraits were taken before those in the ads to which they are matched. Probing mass media and its identity-forging potential with a sense of criticality, Iveković offers in this series an investigation of representation by exploring her own life retroactively." about her Double Life Series.
The images below I found from this website
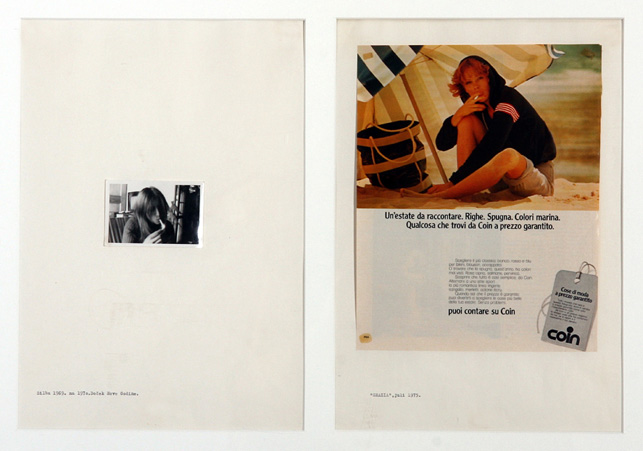
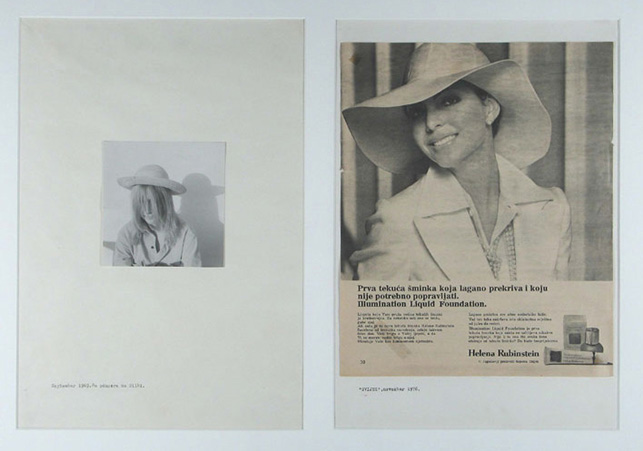
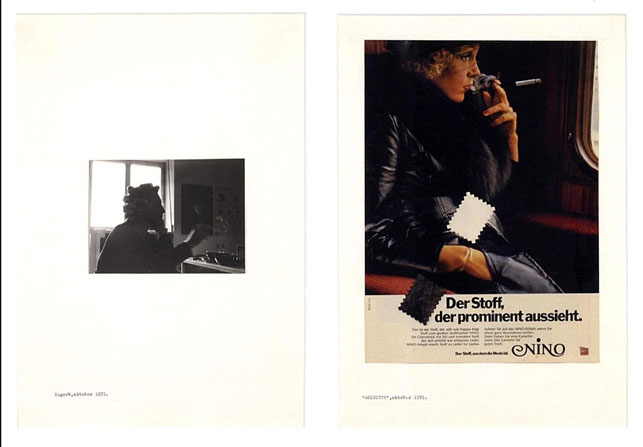
The images above could be related back to my project with Disney, as the actors in the character costumes are trying to mimic the characters that they're trying to portray from Disney films. This is like what Ivekovic has done using herself and pictures from women's fashion magazines. As Ivekovic has used facial expression, gesture, and pose for her images the actors have done this with the Disney images that I will be doing for my project.
The website www.moma.org wrote "For this series, the artist juxtaposed pictures of herself culled from her private albums with commercial ads clipped from the pages of popular magazines and newspapers. One part of each pair depicts Iveković through distinct periods of her life, enacting for the camera different poses, while the other part shows models advertising in women’s magazines such as Elle, Grazia, Brigitte, and Svijet. If you look closely, you will notice that sets are paired on the basis of similarities in appearance, gesture, props, locations, and situations. All images are dated, making clear that in most cases the artist was not simply mirroring media constructs of femininity but in fact was predating them—many of her remarkable self-portraits were taken before those in the ads to which they are matched. Probing mass media and its identity-forging potential with a sense of criticality, Iveković offers in this series an investigation of representation by exploring her own life retroactively." about her Double Life Series.
The images below I found from this website
The images above could be related back to my project with Disney, as the actors in the character costumes are trying to mimic the characters that they're trying to portray from Disney films. This is like what Ivekovic has done using herself and pictures from women's fashion magazines. As Ivekovic has used facial expression, gesture, and pose for her images the actors have done this with the Disney images that I will be doing for my project.
Research & Planning Disney // Signs


Jirka Väätäinen Research // Signs
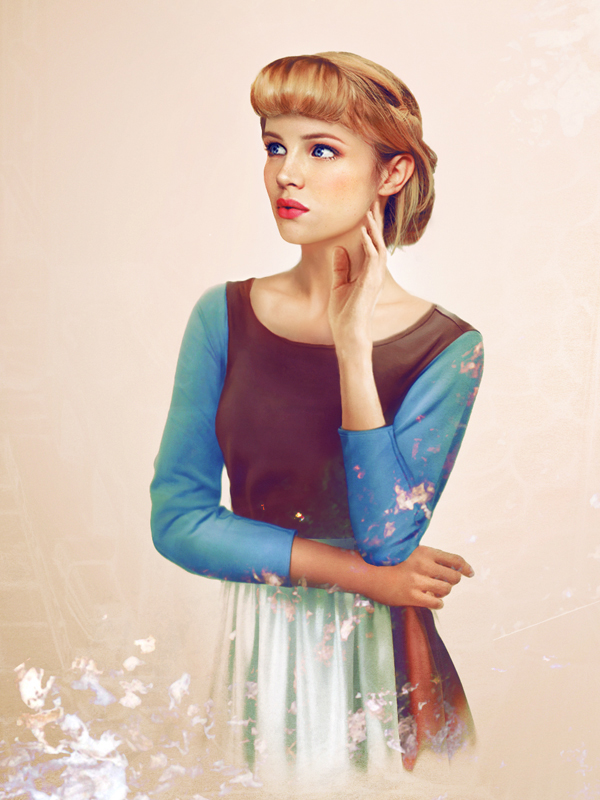
Artist Jirka Väätäinen has re-imagined the Disney prince and princesses in real life.
This is quite interesting as Disney imagined them all as animated cartoons, so he has taken his own spin on them.
With Disneyland having real people dressed up as Disney characters (not ruining the magic of it haha) and not using cartoon statues or holograms, this is quite interesting in my research and prep for my project.
Most of them include some type of gesture, which is what I'm basing my project on. With this I can see some of the ways in which Väätäinen thinks are their main poses and gestures.
website - "real life" Disney characters project.

For Rapunzel, he has created her with her hair loose and not plaited like it is in most of the movie.
Her gesture is one hand on her hip, and one hand holding her hair. This is striking it's focusing on her hair which is 'really' long.
Cinderella has been created wearing her 'servant girl' clothing, compared to her ball gown that she has for the Royal Ball.
Her gesture is one arm bent across her waist, with her other elbow resting on it and that hand touching her neck. Almost as if she's thinking.
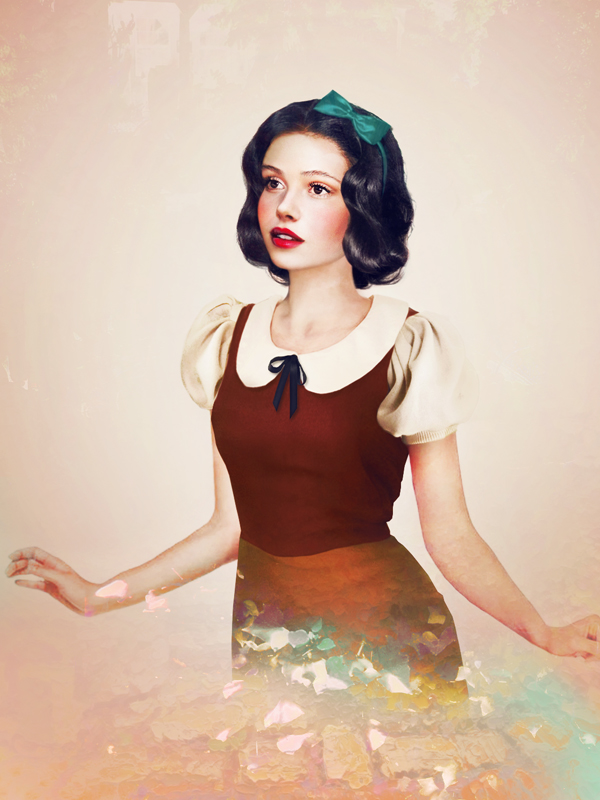
Snow White's gesture is her hands out to the side with her arms bent at the elbow, which is almost as if she's looking at something.
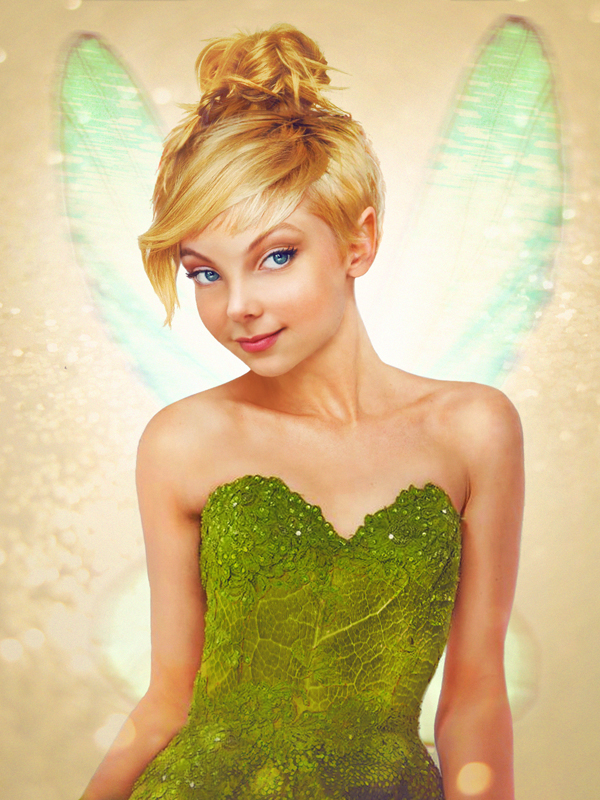
Tinkerbell is staring straight at the viewer with a smirk on her face, which is typical of her character as she is supposedly a 'cheeky' fairy
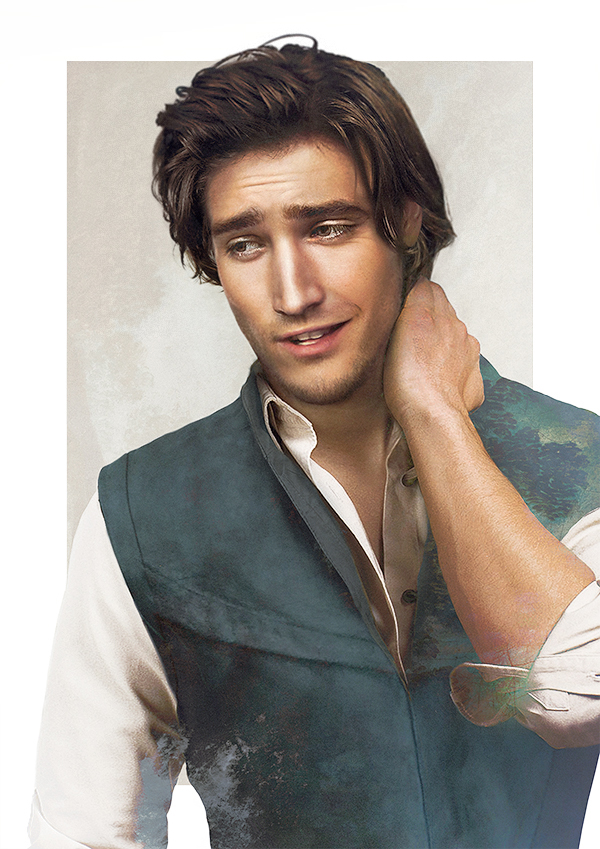
Flynn Ryder from the movie Tangled, is pictured here looking to the left side of the image, smirking with his right hand on his neck.
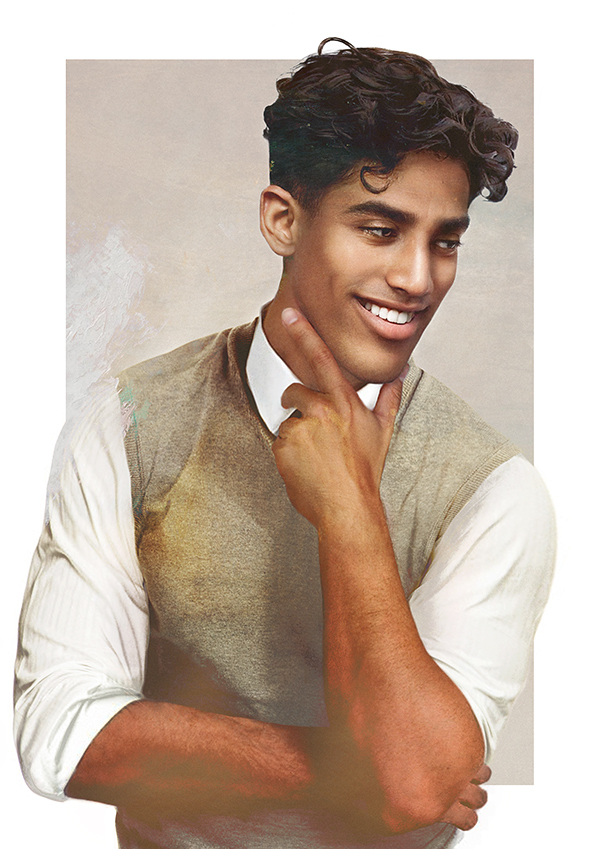
Prince Naveen (from The Princess And The Frog) is pictured here grinning into the right side of the image, with his gesture looking almost as if he is thinking.
Peter Pan is leaning on his left arm and looking out to the right of the image with his eyebrows raised, almost as if something's caught his attention
I can relate this to the photos for my project by the idea that they're all in 'human form' and they're gestures and expressions have been made to fit the character that they're each supposed to be. This is what I was aiming at capturing in my project at Disneyland Paris as they're 'real life, human sized' characters who have to portray the character that they're dressed as. This is through their body language, such as gestures, facial expressions, and poses; this is what Väätäinen has also done through his images.
This is quite interesting as Disney imagined them all as animated cartoons, so he has taken his own spin on them.
With Disneyland having real people dressed up as Disney characters (not ruining the magic of it haha) and not using cartoon statues or holograms, this is quite interesting in my research and prep for my project.
Most of them include some type of gesture, which is what I'm basing my project on. With this I can see some of the ways in which Väätäinen thinks are their main poses and gestures.
website - "real life" Disney characters project.
For Rapunzel, he has created her with her hair loose and not plaited like it is in most of the movie.
Her gesture is one hand on her hip, and one hand holding her hair. This is striking it's focusing on her hair which is 'really' long.
Cinderella has been created wearing her 'servant girl' clothing, compared to her ball gown that she has for the Royal Ball.
Her gesture is one arm bent across her waist, with her other elbow resting on it and that hand touching her neck. Almost as if she's thinking.
Snow White's gesture is her hands out to the side with her arms bent at the elbow, which is almost as if she's looking at something.
Tinkerbell is staring straight at the viewer with a smirk on her face, which is typical of her character as she is supposedly a 'cheeky' fairy
Flynn Ryder from the movie Tangled, is pictured here looking to the left side of the image, smirking with his right hand on his neck.
Prince Naveen (from The Princess And The Frog) is pictured here grinning into the right side of the image, with his gesture looking almost as if he is thinking.
Peter Pan is leaning on his left arm and looking out to the right of the image with his eyebrows raised, almost as if something's caught his attention
I can relate this to the photos for my project by the idea that they're all in 'human form' and they're gestures and expressions have been made to fit the character that they're each supposed to be. This is what I was aiming at capturing in my project at Disneyland Paris as they're 'real life, human sized' characters who have to portray the character that they're dressed as. This is through their body language, such as gestures, facial expressions, and poses; this is what Väätäinen has also done through his images.
Annie Leibovitz // Signs
Annie Leibovitz created the Disney Dream Portrait series, where she worked with 'celebrities' to create a campaign for the Disney Parks in magazines, on billboards, and online.
Some of her images can be found below, with the rest on this website

Taylor Swift as Rapunzel from “Tangled”

Jeff Bridges and Penelope Cruz as Beauty and the Beast

Jennifer Lopez and Marc Anthony as Jasmine and Aladdin

Zac Efron and Vanessa Hudgens from Sleeping Beauty

Rachel Weisz as Snow White

Scarlett Johansson as Cinderella
She used 'famous' people all highly recognised within society to play different characters. Each subject has used their body language of facial expression, stance, pose, and gestures to portray these characters. The background for each image has been used to help portray each character, though they are very recognisable without focusing on the background. Most of these images seem to have a phrase related to Disney and to sell the parks to consumers. Each of the phrases starts with 'where' (on the images that have phrases wrote on them), which is a typical word used in advertisements for Disney Parks by their marketing department.
Some of her images can be found below, with the rest on this website
Taylor Swift as Rapunzel from “Tangled”
Jeff Bridges and Penelope Cruz as Beauty and the Beast
Jennifer Lopez and Marc Anthony as Jasmine and Aladdin
Zac Efron and Vanessa Hudgens from Sleeping Beauty
Rachel Weisz as Snow White
Scarlett Johansson as Cinderella
She used 'famous' people all highly recognised within society to play different characters. Each subject has used their body language of facial expression, stance, pose, and gestures to portray these characters. The background for each image has been used to help portray each character, though they are very recognisable without focusing on the background. Most of these images seem to have a phrase related to Disney and to sell the parks to consumers. Each of the phrases starts with 'where' (on the images that have phrases wrote on them), which is a typical word used in advertisements for Disney Parks by their marketing department.
Kevin-Davis-Photography Research // Signs
Kevin Davis is a photographer that I found on flickr who took photos of Disney characters. I have researched due to my project being about Disney characters, their body language and also how he photographed them.
 The image above is of Flynn Rider from the Disney film, Tangled. He is sat on some sort of float from a parade, looking straight into the camera as well as pointing at it. He has one leg down, with the other bent up.
He has been photographed diagonally on to the image. He isn't positioned central within the image, but his leg is in the centre with his body nearer to the right side of the image. Though this is how he is positioned, he is still the point of focus for the image.
 The image above is of Rapunzel, who is from the movie Tangled. She is grinning at the camera, with her hands clasped together in a hopeful position. Her body is turned to the right side of the image, which is a typical pose for the character of Rapunzel.
She has been photographed in the very centre of the image taking up most of the frame,this has made her the point of focus for the viewer due to her taking up most of the image.
 This image is of Ariel, from The Little Mermaid. She has been photographed on a float, where she is sat inside a clam which is typical of the sea - so contextual to the movie. She has her tail down , while staring up at her hand that's in the air.
The composition of the image is made up of the subject being in the top half of the image within the centre, with her tail going out the right side of the image.

He has been photographed diagonally on to the image. He isn't positioned central within the image, but his leg is in the centre with his body nearer to the right side of the image. Though this is how he is positioned, he is still the point of focus for the image.

She has been photographed in the very centre of the image taking up most of the frame,this has made her the point of focus for the viewer due to her taking up most of the image.

The composition of the image is made up of the subject being in the top half of the image within the centre, with her tail going out the right side of the image.
Drick172 Research // Signs
Drick172 is a photographer that I found on flickr who has photographed Disney characters.
 The image above is of Donald Duck, in one of his classic poses. This is through his facial expression being controlled by a mask, his gesture and stance is what is controlled by the actor. This is through them knowing the characters and making sure that they represent them through exaggerated gestures and poses.
The photo has been taken with Donald central within the frame, creating him the point of focus for the viewer.
 The image above is of Goofy, who also consists of a mask and the actor controlling the stance and gesture of the character. Since these are all that the actor is in control of, they are exaggerated, this is through him putting one finger on his mouth while his other arm is out to the side and outstretched one leg
The photo has been taken with Goofy central in the image, with his arm and leg outstretched creating him the point of focus for the viewer, this is also because he is the subject within the image.
 Mickey Mouse also consists of a mask, also meaning that the actor has created an exaggerated gesture due to that being one of the few things they can control. They have outstretched both their arms into a 'welcoming' pose, with one leg turned slightly to the side on the heel.
He is also central within the image, creating him the point of focus for the viewer. This is striking as Mickey Mouse's costume is made up of bright colours, which makes it very eye catching to the viewer.

The photo has been taken with Donald central within the frame, creating him the point of focus for the viewer.

The photo has been taken with Goofy central in the image, with his arm and leg outstretched creating him the point of focus for the viewer, this is also because he is the subject within the image.

He is also central within the image, creating him the point of focus for the viewer. This is striking as Mickey Mouse's costume is made up of bright colours, which makes it very eye catching to the viewer.
Disneyland Paris Project Choice // Signs
Due to this year's exam project going on during the period in which I go away with one of my college course's, I thought that would be the perfect opportunity for them to coincide. Leaving on the 5th March, and getting back home on the 8th March is the ideal period for me to make my project happen. I would be going to Disneyland Paris for two full days around the parks. With Disney characters being so unique and interesting, it would work well for a completely unique project.
I will be taking pictures of the characters on their own, with asking them to stand in their classic poses. This will be looking into how the characters are portrayed through signs such as gestures, stance, pose, facial expression, and more.
I'm hoping to capture a wide range of characters from different films, so there will be a diverse set of images showing many characters all with different 'signs'.

credit: http://sunshinestacey.com/wp-content/uploads/2015/11/disneyland-paris-logo-400x280.png
I will be taking pictures of the characters on their own, with asking them to stand in their classic poses. This will be looking into how the characters are portrayed through signs such as gestures, stance, pose, facial expression, and more.
I'm hoping to capture a wide range of characters from different films, so there will be a diverse set of images showing many characters all with different 'signs'.
credit: http://sunshinestacey.com/wp-content/uploads/2015/11/disneyland-paris-logo-400x280.png
Project Choice // Signs
Below is the development of my spider diagrams to how I got to my final project idea. Each spider web progresses on from the next.


Exam Project
With the exam project we were given the option of ten words, of which we had to choose one and create a project around it. Five words being stimuli, which gets you to think, and five words being observational, which gets you to see things. The ten words from the exam project booklet are pictured below.

I chose the fifth word from the list being 'signs' as I felt it suited me better and the route I wanted to take my work. This is due to signs being around us and a part of our everyday lives

Project Evaluation // Making Tracks
What was the project brief?
The brief of my project was the 'Making Tracks', which involved different types of transportation that people use in every day life.
1. What was the project theme and what did you think of it?
My project theme was 'Making Tracks', which I go to choose myself with the help of my family and tutors. I quite liked due to the fact that it wasn't really a type a photography that I would generally think about. Also the words making tracks can mean different things to different people, so it gave me a diverse range of things that I could look at for my project.
2. What part of the project did you enjoy the most / find the most interesting?
The part of the project that I enjoyed the most was that since it wasn't a type of photography that I'd usually do or even think about, I was putting myself out of my comfort zone. Through doing this I learnt new things, saw other people's perspectives on what they like in photography.
3. What new techniques have you experienced?
I learnt that with this type of photography that you have to be patient and be willing to wait around a lot of the time. Though you have to be set up and be ready to shoot when there's a train coming. I also learnt about having to sort the composition of my images out in a matter of seconds as I didn't have a subject that was willing to wait around for me to be ready to shoot.
4. What technique would you like to develop further?
I would like to develop my skills with composition with only having a few seconds at most to sort this out. This is because composition is a vital element of any photo, and getting it right is what makes a good photograph. Also there are many other types of photography that there are only seconds to sort out composition, such as live event / concert photography this is due to the artists moving around the stage constantly.
5. Which photographers did you research in this project?
The photographers that I researched in this project were Simon Coult, Glynn Farrar, Ian Egner, and Jim Pearson
6. How have they influenced your photographs?
They have influenced my photographs by using concepts, ideas, and techniques of theirs within my images to get the results I have and desired.
7. Which technique did you enjoy the most?
The technique that I enjoyed the most was creating light trails using the 'A' setting to let more light into my camera and not create an instant picture. I did this with car, trams, and trains with each of them creating a different effect to each other.
8. What do you feel is the most successful part of your project and why?
I feel the most successful part of my project is the images involving light trails, this is due to how they have turned out. As the light in each of the images is so striking it has made a very clear point of focus within the image, which is what I wanted to do.
9.Did you encounter any problems with your project?
The only problem I really encountered with the project is the weather, though it did help me at points, though rain pelting down isn't really a weather condition that I enjoy being out in.
10. What would you do differently given the chance to complete the project again?
If I had the opportunity to complete this project again I would get immersed in it from the get go, learning more techniques and going out for a few more shoots.
11. What do you think about your final outcome and what are your feelings about the project?
I quite like the final outcome of my project as I have some good results for a type of photography that I had never done before starting this project.
Final images // Making Tracks
The images below are the ones that I have chosen as my final images for the project, this is due them being the best ones that I took in my opinion and sum my project up pretty well.

I am very happy with how my project has turned out and come together, with my final images summing up my project and all the images I took. To me, this shows the theme of 'Making Tracks' though the various images.
Meadowhall Shoot // Making Tracks
These images are from a shoot that I did at Meadowhall interchange, in which I looked at the variety of transport there that uses the interchange. This involved trains, buses and trams.

I'm quite happy with the results of these images, as they were my second shoot of trains and my first shoot of buses and trams during the day. These images in my opinion capture the essence of train stations and public transport as images from DSC_0095 to DSC_0104 show people getting on and off trains which is one of the main things people see at train stations. Therefore these images have an aspect of street photography in them due to it showing people going about their daily life on and off trains.
DSC_0073 didn't work out very well as I happened to have my camera on the wrong setting at the time of taking that picture, which I worked out before taking another picture.
Tram Light Trails // Making Tracks
These images of light trails with trams were taken in Sheaf Square in Sheffield City Centre. They were taken after a rain storm which has created reflections within the image.

I also took inspiration for these images from Ian Egner due to them being light trails, which the concept of has helped to form these images.
I am really happy with the results of these images as they have really captured the lights of vehicles moving and created tracks through the light trails.
My favourites are DSC_0137 DSC_0140 DSC_0142 DSC_1235 and DSC_1237, this is due to the angle in which the picture was taken as well as the light trail being so prominent within the image that it has made the point of focus of the image for the viewer. Each image has a slightly different composition which helps to make each of the images unique.
Trains Light Trails Shoot // Making Tracks
The images above I took at Sheffield Train Station at night, whilst it was raining - which created the reflections in the tracks and on the ballast. I did this by using my 'A' setting on my camera to open up the lens and let as much light in as possible.

For these images, I took inspiration from Ian Egner as even though he did light trails with cars on roads, this is another form of light trail done which is creating lines of where the vehicle has been.
I am very happy with the results of these images as they are unique, with each image being slightly different and the colours of the lights from the trains being very prominent. This has helped to create the light trail in each image as the point of focus for the viewer.
DSC_0112 is my favourite image out of these images of train light trails as by chance I managed to capture two trains within the image, one coming towards the camera and one going away; which resulted in one lot of white lines and one lot of red lines.
Jim Pearson Research // Making Tracks
I have researched Jim Pearson, who specialises in rail roading photography as well as wild life photography. He's from Kentucky, America where you get massive rail road trains.
Photo's have been taken off his website
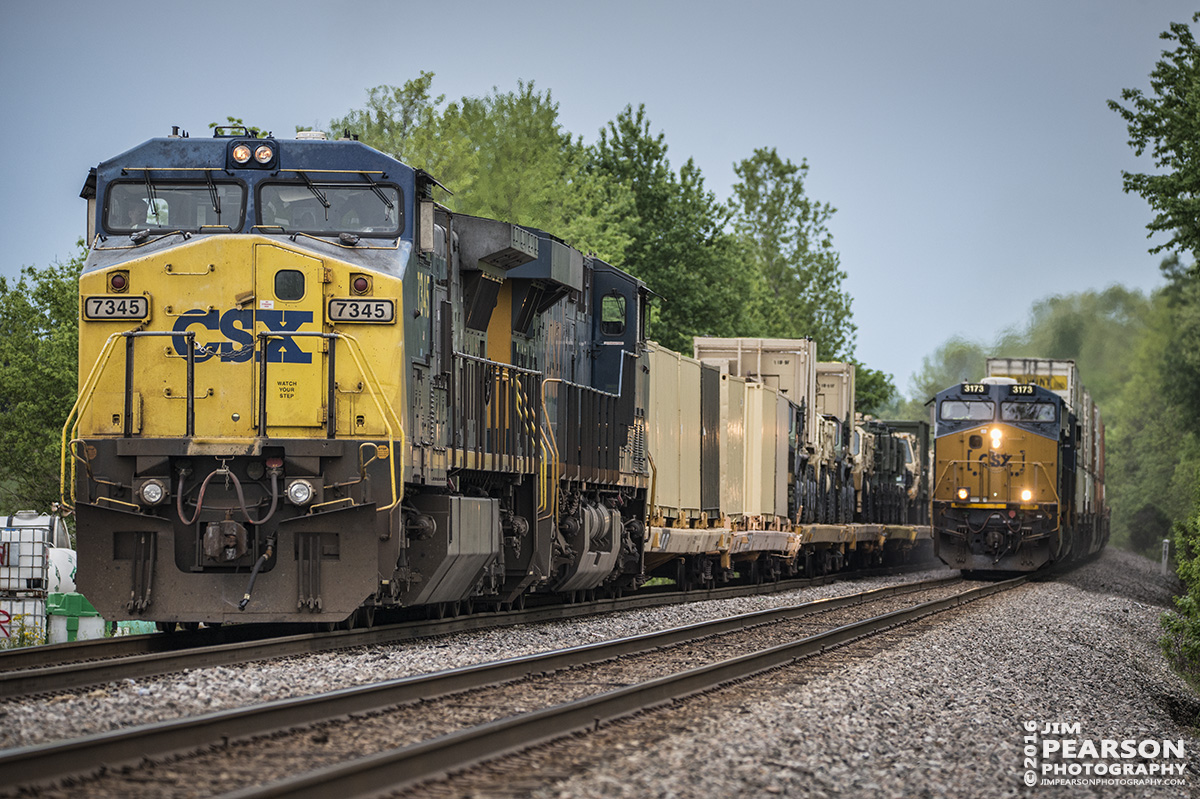 The image above shows two freight trains close to each other. The image has been taken from the side of the train tracks, with the trains being quite head on to the camera, with the freight locomotives able to be seen behind the train. The colours of the image stand out clearly, with this and the composition making it a very powerful image. The composition is made up of the lines of the tracks, the trains being the main point of focus within the image, and the rule of thirds being used with different parts of the train being in each third.
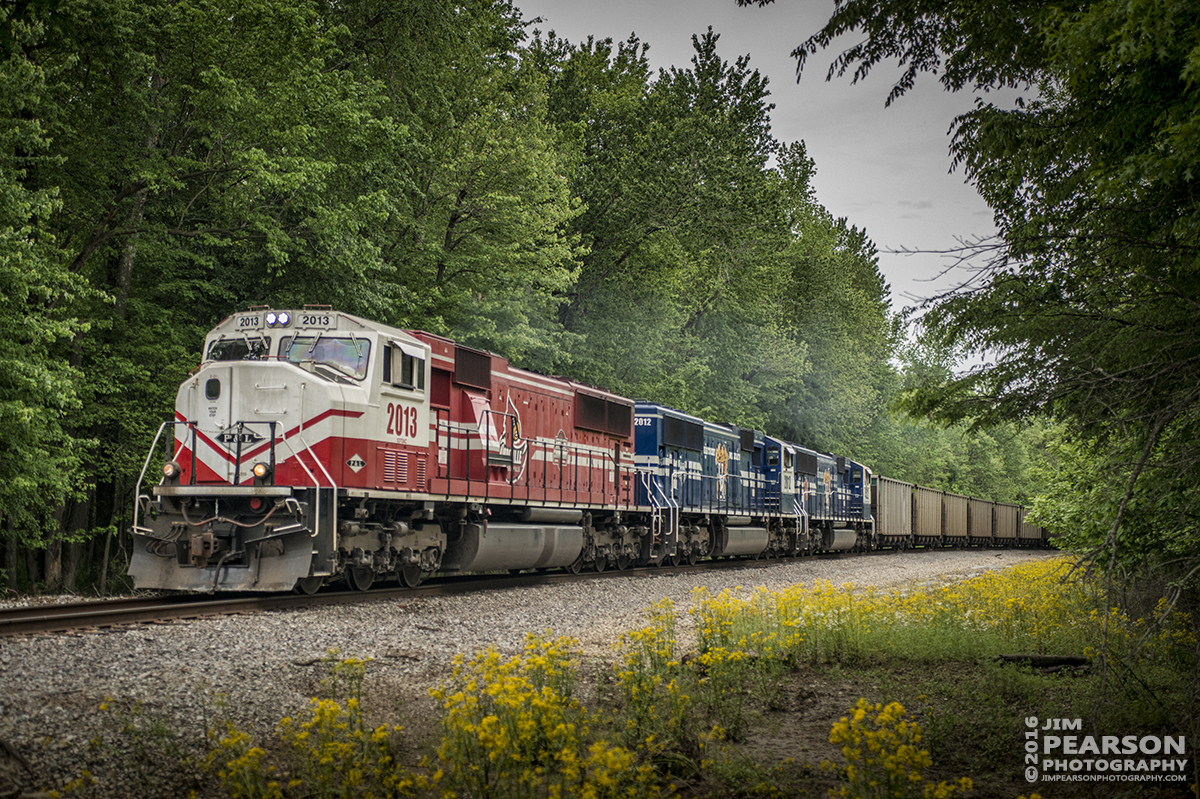 The image is above is striking as it consists of foreground, the subject, and the background. This has been done by the photograph being taken from a distance, therefore being able to capture the subject as it has been. The train has been taken from an angle so its not side on or straight on to the camera, so you can see the front of the train and the side of the train at the same time. The colours in all aspects of the image stand out, with the reds, blues, greens, and yellows.
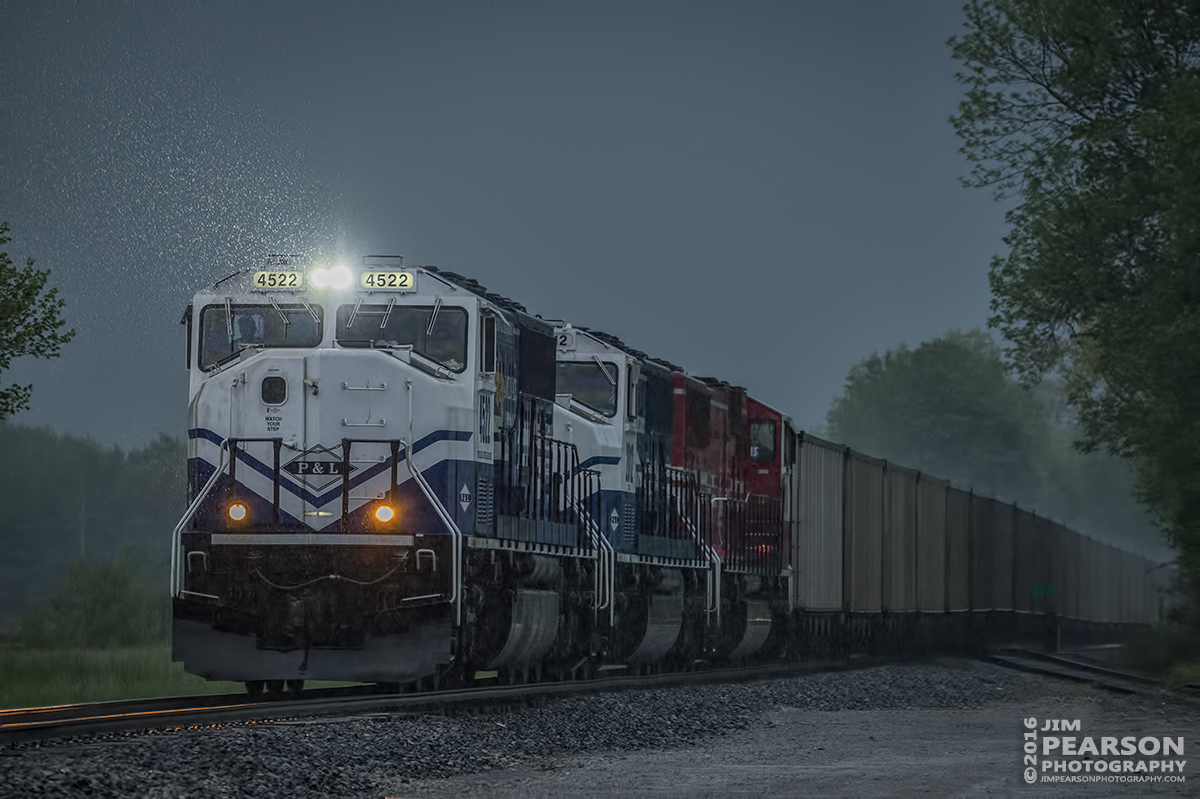 The image above has been taken on a very grey day, and through the headlight of the train you can see the weather condition of rain through the image. With the sky in the image being very grey, it makes the colours much bleaker. The train is the point of focus within the image, with the colours of the front of it standing out compared to the rest of the image.
These images by Jim Pearson, I used for inspiration for taking photographs of trains within my project due to how he's set up the shot and how the images have come out.
Photo's have been taken off his website
These images by Jim Pearson, I used for inspiration for taking photographs of trains within my project due to how he's set up the shot and how the images have come out.
Planes Shoot // Making Tracks
I took some photo's of aeroplanes in the sky, due to this being a form of transport in which people travel distance with and 'make tracks'.

I am quite happy with the images that I have taken this is due to the images showcasing the planes that we see from the sky every day. Also as the theme of the project is 'making tracks' and the planes are leaving trails behind them which is a form of track of where they've just been.
I took images of planes in the sky due that being as close as I really could get, as I don't use an airfield and don't have access to planes.
I took some inspiration from Glynn Farrar in this, but it was mainly down to trying out aviation photography as I couldn't get the type of images that he can.
Below is a contact sheet of the images that I took.

I am quite happy with the images that I have taken this is due to the images showcasing the planes that we see from the sky every day. Also as the theme of the project is 'making tracks' and the planes are leaving trails behind them which is a form of track of where they've just been.
Glynn Farrar Research // Making Tracks
I have researched Glynn Farrar, who is a semi-professional aviation photographer. He's a pilot and photographer at Netherthorpe airfield, near Worksop.
The photographs below are images provided by Glynn Farrar through email.
 This image shows a plane front-on, central within the image after having recently taken off. The propeller at the front of the plane is blurred to showcase the movement of the plane rather than a static shot in mid-air. The colours within the image are very prominent, which makes the image more striking.
 This image is very powerful, due to how the picture has been taken. As the picture has been taken through panning the camera to follow the plane and keep it in focus, whist the background and propeller are blurred to show speed and the element of movement. The plane is central within the image, though slightly tilted this makes the composition of the image another element of the photograph striking.
 This image is incredibly striking due to it being formation flying, with the choice of background used to make the planes stand out. This image has been taken from the air, above the planes he is taking the picture of to get the green background of the ground for the image. The white trails behind the planes stand out due to the background and are an important part of the composition within this image with them creating lines. Also with each plane fitting slightly different third of the image it creates for another compositional element due to the rule of thirds. In taking a shot like this, the skills of the pilots and the preliminary safety briefing are critical to achieving this kind of result.
The photographs below are images provided by Glynn Farrar through email.


Light Trails // Making Tracks
I went out with my dad to take some pictures of cars on the M1 for some images of light trails. We went out to a bridge above the M1 around Rotherham, this gave us the perfect view of the cars and lights.
Below is a contact sheet of the photos that I took there.

I'm really happy with how these images turned out as the light has been captured clearly making the colours striking. Though I prefer the images that I took with some of the skyline in as it makes it seems like they're driving off further into the sunset and the world, rather than just staying in one place.
Subscribe to:
Posts (Atom)